Create a project
Select a project template
To create a new project, you need first to create an empty folder and run the starlake bootstrap CLI command from there:
- Linux/MacOS
- Windows
- Docker
$ mkdir $HOME/userguide
$ cd $HOME/userguide
$ starlake bootstrap
c:\> mkdir c:\userguide
c:\> cd c:\userguide
c:\> starlake bootstrap
$ mkdir $HOME/userguide
$ cd $HOME/userguide
$ docker run  -v `pwd`:/app/userguide -e SL_ROOT=/app/userguide -it starlakeai/starlake:VERSION bootstrap
By default, the project will be created in the current working directory. To bootstrap the project in a different folder set SL_ROOT env variable to that folder:
- Linux/MacOS
- Windows
- Docker
$ SL_ROOT=/my/other/location starlake bootstrap
c:\> set SL_ROOT=c:\my\other\location
c:\> starlake bootstrap
You are always required to set the SL_ROOT env var when using Docker
$ mkdir $HOME/userguide
$ cd $HOME/userguide
$ docker run  -v `pwd`:/app/userguide -e SL_ROOT=/app/userguide -it starlakeai/starlake:VERSION bootstrap
starlake will then create a default project hierarchy that allow you to start to extract, load, transform your data and orchestrate you pipelines.
.
├── metadata
│ ├── application.sl.yml # project configuration
│ ├── env.sl.yml # variables used in the project with their default values
│ ├── env.BQ.sl.yml # variables overriden for a BigQuery connection
│ ├── env.DUCKDB.sl.yml # variables overriden for a DuckDB connection
│ ├── expectations
│ │ └── default.sl.yml # expectations macros
│ ├── extract
│ ├── load
│ ├── transform
│ ├── types
│ │ ├── default.sl.yml # types mapping
└── datasets # sample incoming data for this user guide
└── incoming
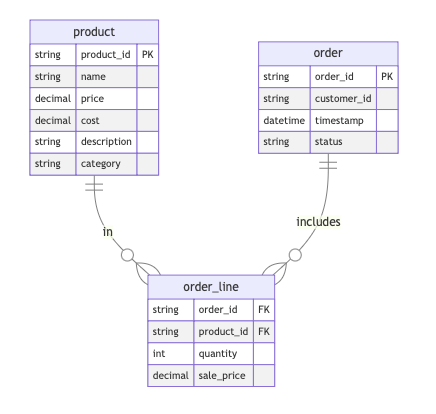
└── starbake
├── order_202403011414.json
├── order_line_202403011415.csv
└── product.xml
- The
incomingfolder host all the files you will want to load into your warehouse. - The
metadatafolder contains the extract, load and transform configuration files - The
expectationsfolder contains the expectations configuration files used for validating the data loaded / transformed in your warehouse
Configure your datawarehouse connection
The project configuration is stored in the metadata/application.sl.yml file. This file contains the project version and the list of connections to the different data sinks.
This application configuration file contains multiple connections:
- Each connection is a sink where data can be loaded/transformed
- The active connection to use for loading/transforming data is specified in the
connectionRefproperty of the application section - The
connectionRefproperty can be set to any of the connection names defined in theconnectionssection. - We use environment variables to override the default values of the project configuration. The example below set the active connectionRef using the
activeConnectionvariable. This allows us to run our project on different datawarehouses (DEV / QA / PROD) without the need to update the project configuration.
---
application:
  connectionRef: "{{activeConnection}}"

  audit:
    sink:
      connectionRef: "{{activeConnection}}"

  connections:
    sparkLocal:
      type: "fs" # Connection to local file system (delta files)
    duckdb:
      type: "jdbc" # Connection to DuckDB
      options:
        url: "jdbc:duckdb:{{SL_ROOT}}/datasets/duckdb.db" # Location of the DuckDB database
        driver: "org.duckdb.DuckDBDriver"
    bigquery:
      type: "bigquery"
      options:
        location: europe-west1
        authType: "APPLICATION_DEFAULT"
        authScopes: "https://www.googleapis.com/auth/cloud-platform"
        writeMethod: "direct"
    redshift:
      ...
    snowflake:
      ...
    ...
The files env.DUCKDB.sl.yml and env.BQ.sl.yml are used to override the default values of the project configuration for the DuckDB and BigQuery connections.
We then only need to define the SL_ENV environment variable to switch between the different environments.
To switch to the DuckDB connection, we can run the following command:
- Linux/MacOS
- Windows
- Docker
$ SL_ENV=DUCKDB starlake <command>>
c:> SET SL_ENV=DUCKDB
c:> starlake <command>>
$ docker run    -v `pwd`:/app/userguide \
                -e SL_ROOT=/app/userguide \
                -e SL_ENV=DUCKDB \
                -it starlakeai/starlake:VERSION <command>
Next steps
That's it, we are ready to go. Let's start by loading some data into our warehouse and then transforming it to make it ready for analysis.
In this tutorial,
- extract data from a database and then load the data into your favorite datawarehouse.
- Run transformations from the command line and from Airflow
- Generate the documentation for the project
We will use the Starbake project, a simple Github project that allows us to create fake data inside a database for our tutorial.